She’s quietly comes to life

dsc03926-1

It’s done! I finished the chest, head and even started the thighs, all Sunday night. And yes, as I mentioned yesterday, the thighs require a lot of clay: 954 grams seems sufficient, but I have to be careful not to miss for the rest.  The eyes are handmade with Swarorvski Crystal cabochons. I love crystal. The finished effect gives a natural, mysterious look and it’s even magical. I intend to finish the sculpting of my doll by the end of the week and start sanding during the weekend.

C’est fait! J’ai terminé le buste, la tête et même commencé les cuisses, tous dimanche soir. Et oui, comme je le mentionnais hier, les cuisses requièrent énormément de pâte : 954 grammes semble suffisant, mais je dois faire attention pour ne pas en manquer pour la suite.  Les yeux sont faits mains avec des cabochons de cristal Swarorvski. J’adore le cristal. L’effet fini donne aspect naturel, mystérieux et même magique. Je compte terminer le modelage de ma poupée d’ici la fin de la semaine et commencer à la sabler durant cour du weekend.

Sculpting the torso…

I finally finished my BJD doll torso and I even continue with the elbows, knees and chest. I am pleased to have my template used: technical drawing of my doll. It has been more than helpful, though I may make other changes once this doll will be completed. The polymer clay that I used is a mixture of Cernit (nougat) and Living Doll (Terracota). I thought about not having enough to sculpt this doll: the fact that I have not yet started the head and particularly the thighs, so far, the chest requires a lot of clay.  But I think it will be fine… I’ll be back tomorrow with more details. Thank you!

J’ai finalement terminé le torse de ma poupée BJD et j’ai même continué les coudes, les genoux et le buste. Je me félicite d’avoir eu recours à mon gabarit : dessin technique de ma poupée. Il m’a été plus qu’utile, quoique je risque d’apporter d’autres modifications une fois cette poupée sera terminée. Les pâtes de polymère que j’ai utilisé sont un mélange de Cernit (nougat) et de Living Doll (Terracota). Je pensais de n’en avoir pas assez pour sculpter cette poupée : le fait que je n’ai pas encore commencé la tête et plus particulièrement les cuisses, jusqu’ici, le torse requière énormément de pâte.  Mais, je crois que cela ira bien…Je vous reviens demain avec la suite. Merci!

Back with my BJD project

Happy Friday and Happy Thanksgiving to all Americans! Tonight, I continue with my BJD doll. Last week, I was able to finish the backbone of my doll. For each part of the doll, I used Super Sculpey Ultra Light polymer clay. That clay is wonderful to touch; however, you must manipulate it in a quick way and with care: it rapidly accumulates dust and hand oil. After baking, it is also very light and is easy to carve. I count on using it a lot for future projects… I will come back to you on the progress of my doll with other images. See you again!

Bon vendredi et bonne action de grâce à tous les américains! Ce soir, je continue avec  ma poupée BJD. La semaine dernière, j’ai pu terminer l’ossature de ma poupée. Pour chacune de parties de la poupée,  j’ai utilisé comme pâte Super Sculpey Ultra Light. C’est une pâte merveilleuse au toucher, par contre, il faut la manipuler de manière rapide et avec soins : elle accumule rapidement la poussière et les matières grasses des mains. Après la cuisson, elle est aussi douce que légère et est facile à sculpter. Je compte L’utilisé énormément pour de futurs projets…Je vous reviendrai sur la progression de ma poupée avec d’autres images. À bientôt!

Painting ceramics

20161119_133940

Good evening! I started to apply the first coat of paint on several of my ceramic pieces. I’m excited about it! I can’t wait to see the final results. In the majority of cases, the paint is of a specific color before you put it in the kiln and it changes once baked. In short, I intend to give a few of them as gifts… family, friends, work colleagues and keep some for me (my favorite ones)! Before leaving you, I finally finished my BJD doll torso and I’ll speak about it a in a few days. Thank you all.

Bonsoir! J’ai commencé à appliquer la première couche de peinture sur plusieurs de mes pièces en céramique. J’en suis excitée! J’ai hâte de voir les résultats finaux. Dans la majorité des cas, la peinture est d’une couleur avant la cuisson et change une fois cuite. Bref, je compte donner en cadeaux ces pièces…famille, amis, collègues de travail et garder quelques uns, mes préférées, pour moi! Avant de vous quitter, j’ai finalement terminé le torse de ma poupée BJD et j’en parlerai d’ici quelques jours. Merci à tous.

20161119_110217
Mixing glaze painting 

Testing textures & colors

amg-doll-ceramic-courses-2
RAKU clay before bisque firing

Happy Sunday to you all! A few weeks ago, I was able to finally shape and explore a few textures with the RAKU clay. Subsequently, after a week of waiting, I was able to test the paint (pigment) with the glaze. Pigments should be handled with care: wearing a mask and gloves are necessary! What was my astonishment and If I can say my disappointment! Several colors did not release the same color after baking and even the varnish was not as bright and lustrous as expected! But hey… as I said, I’m here to learn and explore. In addition, before I complete piece, I need do many tests, and then make a final choice in texture and color.  I will get back to you this coming week with other images on ceramic. See you soon!

Bon dimanche à tous! Il y a quelques semaines, j’ai pu finalement modeler et explorer quelques textures avec la pâte RAKU. Par la suite, après une semaine d’attente, j’ai pu tester la peinture (pigment) avec la glaçure. Les pigments doivent-être manipulés avec soins : le port d’un masque et de gants sont nécessaires! Quel fut mon étonnement et je dirais même, ma déception! Plusieurs couleurs n’ont pas sorti la même couleur après la cuisson et même le vernis n’était pas aussi brillant et lustré! Mais bon…je me suis dite, je suis là pour apprendre et explorer. De plus, avant d’entamer une pièce complète, il me faut faire de nombreux tests, puis faire un choix final en matière de texture et de couleur.  Je vous reviendrai cette semaine avec d’autres images sur la céramique et à bientôt!

My first ceramic creation

amg-doll-ceramic-courses-5

As I promised, on tonight’s post, I present you my first creations in ceramics. I started with small pieces. At first, I knew I had to draw what I wanted as a first work. Initially, I had the idea of creating a soap set for the bathroom, and then I changed my mind as soon as I started to mold. I had the choice between the RAKU clay and porcelain clay. I opted for the RAKU, since I didn’t feel ready for the porcelain clay. RAKU shrinks 10% after the bisque firing. This clay is a gray color before firing and turns an ultra pale pink afterwards. With the RAKU clay, I explored different textures: Snake, striped, lace, etc.  I intend to use these techniques in the development of textile prints for my future fashion doll creations… Other images on my ceramics classes will be posted on my blog tomorrow!

Comme promis, je vous présente mes premières créations en céramique. J’ai commencé avec de petites pièces. Des le départ, je savais que je devais dessiner ce que je voulais comme premier ouvrage. Au début, j’avais l’idée de créer un ensemble de savon pour la toilette, puis j’ai changé d’idée dès que j’ai commencé à modeler. J’avais le choix entre la pâte RAKU ou la porcelaine. J’ai opté pour la RAKU. Je ne me sentais pas prête pour la porcelaine. La pâte RAKU rétrécie de 10% après la cuisson dite biscuit et passe de la couleur grise à un rose ultra pâle. Avec la pâte RAKU, j’ai pu explorer différentes textures : serpent, zébrée, dentelle, etc.  Je compte utiliser ces techniques dans l’élaboration d’imprimés textiles pour de futures créations modes pour mes poupées…D’autres images sur mes cours de céramique seront diffusées sur mon blog, demain!

Viva ceramics!!!

dsc08801
My first bisque firing boles with my own patterns!

Good evening! Since a year now, I intend to register for a ceramics course. As a doll “artist”, I knew that I needed to take a course that would allow me to get further with my creative side. I had to get out of my comfort zone, especially with fashion. Even though the fashion industry is a creative field, nevertheless the fashion industry is defined by specific calendars: research, development, procurement, production, distribution, sales, marketing, and the list goes on… Certain periods of creation and development are even shorter and everything must be produced quickly… In my humble opinion, all of this can affect the authenticity of a creation. Therefore, I had to find a course that would help me to ‘create’ stuff with depth. My courses in textile design, that I recently abandoned, also helped me. On the other hand, although the technique was a must, I felt that something was missing. This is where the idea to join various workshops in crafts came to me! I’m happy to have listened to my own instinct, since it was the right thing to do! I have never had so much fun! I have learned new techniques that are useful to me! I intend to post several of my ceramic works. Because I want to do so! Making dolls is great, but if they are created with no depth and without a creative mind, they will quickly move to oblivion! At least this is my opinion! Thanks and I’ll be back in a few days with other ceramic creations!

Bonsoir! Depuis de un an, j’avais l’intention de m’inscrire à un cours de céramique. En tant que « artiste » en poupée, je savais qu’il me fallait un cours qui me permettrait d’aller plus loin côté créatif. Je devais sortir de ma zone de confort, plus particulièrement avec la mode. Quoique l’industrie de la mode soit un domaine créatif, il n’en reste pas moins, qu’elle est industrie menée par des calendriers biens définis : recherches, développement, achats, production, distribution, vente, marketing, et la liste est longue…  Certaines périodes de création et de développement sont même plus courtes et tout doit être produit dans une vitesse…À mon humble avis, tout ceci, peut nuire à l’authenticité d’une création. Donc, je me devais trouver un cours qui m’aiderait à travailler la « création » avec profondeur. Mes cours en design textile, que j’ai tout dernièrement abandonnés, m’ont également aidé. Par contre, la aussi, quoique la technique était primordiale, j’ai senti qu’il manquait quelque chose. C’est là l’idée de m’inscrire à divers ateliers en métiers d’art m’est venue! Je suis heureuse d’avoir écouté mon instinct et qui c’est à vairé juste! Je ne me suis jamais autant amusée! J’apprends à chaque cours de nouvelles techniques qui me sont biens utiles! Je compte pour les prochains posts, vous partager quelques uns de mes ouvrages. J’en ai vraiment le goût! Réaliser des poupées, c’est ben beau, mais si elles sont créées  aven aucune profondeur et sans esprit créatif, elles passeront vite aux oubliettes! Du moins c’est mon opinion! Merci et je vous reviens dans quelques jours avec d’autres créations en céramique!

BJD in the making!

amg-doll-bjd-prototype-2

Happy Sunday morning! A few days ago, I finally started my Ball Jointed Doll (BJD). Although other changes will be made, once the finished doll will be finally made, the corrections on my technical drawings were very useful. To begin this doll, I decided to experiment some personal techniques, including the use of plastic straws for the framing. Each part of the doll will consist of a bespoke cut straw. Subsequently, each trimmed straw will be wrapped with a layer of polymer clay (Sculpey Ultra Light). This light and strong clay is often used for creating unique jewelry art pieces used by artists. I must confess that I am conquered with this clay, it is so easy to mold and even after baking, it carves well. On the other hand, the advantage of this polymer clay is that once baked, it is just as light as a sheet of paper. According to what I have read, this asset is necessary so that the BJD, in polymer clay, stands:  the heavier the parts are, the more the balance will be off. And that’s what prevents the BJD, in polymer clay, to keep the poses fluid. To close this post, I inform you, in the last six months, I took a few classes in ceramics. I plan to take others in the spring of 2017. Do not be surprised that the next few posts will be mainly allocated to a few ceramic pieces that I did this year. This will give me the time to continue my BJD in a calmer period before the Holiday rush. This project requires a lot of time, patience and energy. In the meantime, have a great day and I’ll be back in a few days. Thanks everybody!

Bon dimanche matin! Il y a quelques jours, j’ai finalement commencé ma poupée (BJD). Quoique d’autres modifications seront apportées, une fois la poupée terminée, les corrections apportées sur mes dessins techniques étaient très utiles. Pour débuter cette poupée, j’ai décidé d’expérimenté quelques techniques personnelles, dont l’utilisation de pailles de plastique pour réaliser l’ossature. Chaque partie ou pièce de la poupée sera composée d’une paille taillée sur-mesure. Par la  suite, chaque paille taillée sera enveloppée d’une couche de pâte de polymère (Sculpey Ultra Light). Cette pâte légère et solide est souvent utilisée pour la création de bijoux uniques d’artiste. Je dois vous avouer que je suis conquise avec cette pâte, elle est si facile à modeler et même après la cuisson, elle se sculpte bien. D’autre part, l’avantage de cette pâte de polymère, c’est qu’une fois cuite, elle est tout aussi légère qu’une feuille de papier. Selon ce que j’ai pu lire, cet atout est nécessaire pour que la poupée BJD, en pâte de polymère, reste debout : plus les pièces sont lourdes, plus l’équilibre est contrarié. Et c’est ce qui empêche la poupée BJD, en pâte de polymère, de garder des poses fluides. Pour clore ce post, je vous informe que j’ai pris quelques cours de céramique au cours des six derniers mois. Je pense en prendre d’autres d’ici le printemps 2017. Ne soyez pas étonnez que les prochains postes seront principalement alloués à quelques pièces en céramique que j’ai réalisée cette année. Cela me donnera le temps de continuer ma poupée BJD dans le calme avant la période folle des fêtes. Ce projet demande beaucoup de temps, de patience et d’énergie. D’ici-là, passez une bonne journée et je vous reviens dans quelques jours. Merci à tous!

Technical drawing corrections

amg-doll-bjd-project-2-2016

Good evening! A few days ago, I showed you my drawings of my first Ball Jointed Doll project.  I’m very excited about it; however, by watching my technical drawings, several corrections had to be made by starting with the elbows and knees. The bust, the torso, the hips and the arms all have to be reworked. I have to admit that this work of three days was enormous, since I had to redraw each piece of the doll (front, back and profile). Subsequently, in order to protect this long work, everything had to be plastic-coated. Other corrections may be added, but only when I have finished my first BJD (ball jointed doll) that I will begin shortly. Wish me luck! In the meantime, I will come back with more details. Have a good evening my friends!

Bonsoir! Il ya quelques jours, je vous ai montré mes dessins techniques de ma toute première poupée BJD.  J’en suis très excitée, toutefois,  à force de regarder mes dessins techniques, plusieurs corrections ont dû être effectuées par commencer par les coudes et les genoux.   Le buste, le torse, les hanches et ainsi que les bras ont tous été retravaillé. J’avoue que ce travail de trois jours fut énorme, puisque je devais tous redessiner chaque pièce de la poupée (de face, de dos et de profil). Par la suite, afin de projet ce long ouvrage, tout devait être plastifié. D’autres corrections seront peut-être ajoutées, mais uniquement lorsque j’aurai terminé ma toute première poupée BJD que je commencerai d’ici peu. Souhaitez-moi bonne chance! D’ici-là, je vous reviendrez avec plus de détail. Passez une bonne soirée mes amis!

My new BJD journey has begin!

amg-doll-bjd-project

Hello dolly folks! A few weeks ago, I presented you my new doll journey: I am making my very first bjd project! To make this first doll, I need to be very well prepared in order to make this precious very first “lady”! There were four things I needed to ask myself:

1-What kind of doll I wanted aesthetically in terms of her silhouette, height and face?

2-How articulate I wanted her to be and with how many joints?

3-In what material (medium) she will be made (air drying clay or polymer clay)?

4-How and want I need to begin with?

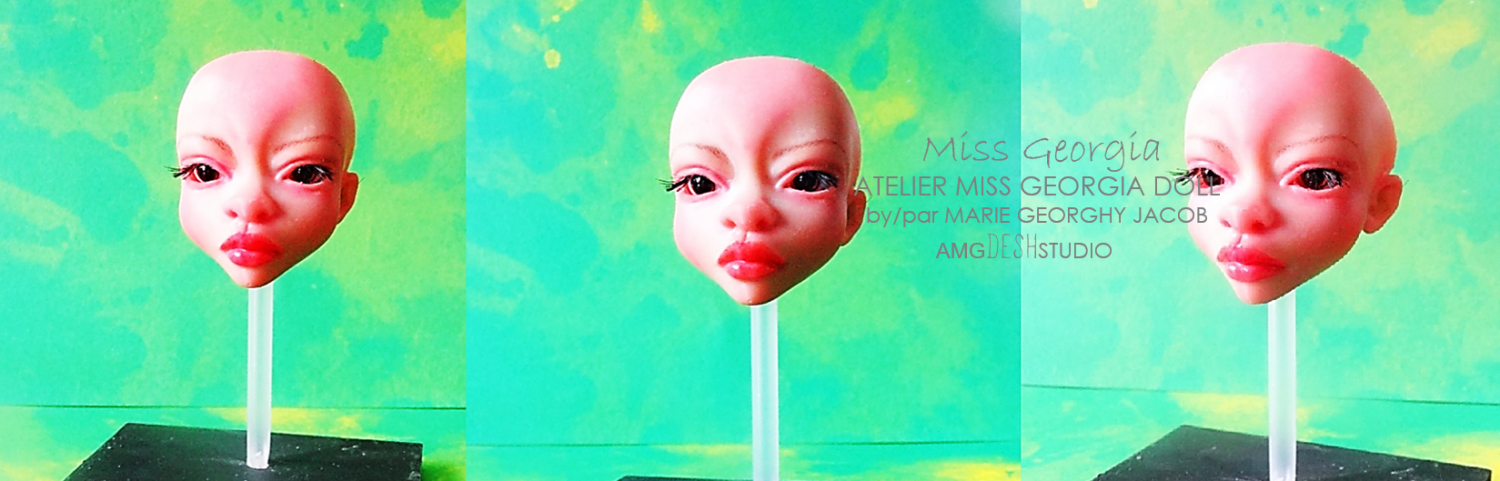
All these questions needed to be answered! The first question was an easy one; I decided to stay loyal to what I did previously with my other figurative fashion art dolls.  My dolls are beautiful young women from different ethnic backgrounds and their bodies are somewhat thin and healthy.  For the fantasy side, I also love them with a little animate look too! For the articulations, I went with 18 points of articulation with double joints on both knees and elbows. It will be a lot of work, but I am ready for the challenge! As for the material, I didn’t want to torture myself with that question: I went with what I know best, polymer clay!

Finally, to begin this big project, I had to make a plan. Having a technical plan was the key in order to make a good work and to succeed this precious doll project! I had to write down and photograph all steps and details of what I’ve made. Though it took me nearly two years to educate myself on how to create that kind of doll, with the help of various bjd books and DVDs,  it made my work somewhat easier.

The picture that is featured in this post is one of my numerous doll drawings.  Normally, in order to have different views of my dolls, I draw the front, the back and the profile side.  At first, the doll drawing was 18’’ (45.6 cm), so I had to scale it up about 20% in order to make a 19 ½” doll (49.5 cm). Sorry, but I prefer tall dolls and I am somewhat reluctant in making smaller ones. In my opinion, this height is wonderful to showcase beautiful fashion designs. Next, I draw the outline of the doll sketch by using a blue print paper. Following this, I draw all the different pieces of the doll, including the different balls and sockets.

Believe it or not, it took me nearly a month to make this technical doll drawing, where I spent two hours everyday making changes.  More details will come during the week.  Thanks everyone!

This slideshow requires JavaScript.

Bonjour les fans de poupées! Il y a quelques semaines, je vous ai présenté ma toute nouvelle aventure avec les poupées: je réalise ma toute première poupée bjd ! Pour réaliser cette toute première « Dame » qui m’est précieuse, j’ai eu besoin d’être très bien préparé afin de rendre ce projet une réalité ! Quatre questions devaient-être répondues :

1-Quel genre de poupée, esthétiquement je voulais en fonction de sa silhouette, de sa taille et de son visage ?

2-Son articulation devait-être comment et avec combien de joints ?

3-Dans quel matériel (médium) elle serait modelée (la pâte à papier ou la pâte de polymère) ?

4-Comment et par où devais-je commencer?

Toutes ces questions devaient être répondues! La première question était facile ; J’ai décidé de rester fidèle à ce que je faisais auparavant avec mes autres poupées modes et figuratives.  Mes poupées sont de belles jeunes femmes de différentes origines ethniques et leur corps est mince et en bonne santé.  Pour le côté fantastique, je les aime aussi avec look un peu anime! En ce qui concerne les articulations, j’ai optée pour les 18 points d’articulation avec des joints doubles sur les genoux et les coudes. Beaucoup de travail m’attend, mais je suis prêt à relever le défi ! En ce qui à trait au matériel, je ne voulais pas me torturer avec cette question : je suis allée avec ce que je connais le mieux, la pâte de polymère!

Enfin, pour débuter ce grand projet, j’ai dû faire un plan. Avoir un plan technique a été la clé afin de réaliser un bon travail et pour réussir ce précieux projet de poupée! J’ai eu à écrire et à photographier toutes les étapes et les détails de ce que je réalisais. Bien qu’il m’ait fallu presque deux ans, afin de m’informer sur la façon de créer ce genre de poupée, avec l’aide de divers livres de bjd et de DVD, mon travail c’est avéré un peu plus facile. 

L’image qui est en vedette sur ce post est une de mes nombreux dessins de poupée.  Normalement, pour avoir des vues différentes de mes poupées, je dessine l’avant, l’arrière et le profil.  Dans un premier temps, le dessin de la poupée est de 18” (45,6 cm), donc j’ai dû la redimensionner  à environ 20 %, afin de faire une poupée de 19 ½”(49,5 cm) de haut. Désolé, mais je préfère les grandes poupées et je suis assez réticente à en fabriquer des petites. À mon avis, cette hauteur est merveilleuse pour présenter de magnifiques accoutrements modes. Ensuite, j’ai tracé le contour de l’esquisse de la poupée à l’aide d’un papier bleu. Suite à cela, j’ai dessiné toutes les différentes pièces, y compris les tailles des balles et des douilles de la poupée.

Croyez-le ou non, il m’a fallu près d’un mois pour faire ce dessin technique et où j’ai dû passé deux heures par jour, apporter des modifications.  Plus de détails viendront au cours de la semaine.  Merci à tous!