Hello! Yes, I make two new head molds to test the brand-new Cos Clay polymer clay. I am excited to see the result of these heads once realized. PS: Five Cos Clay doll colors are available and I will test them all!
Bonjour! Hé oui, je réalise deux nouveaux moules de tête afin de tester la toute nouvelle pâte de polymère Cos Clay. Je suis excitée de voir le résultat final de ces têtes une fois réalisées. PS : Cinq couleurs Cos Clay doll sont disponibles et je vais tous les tester!
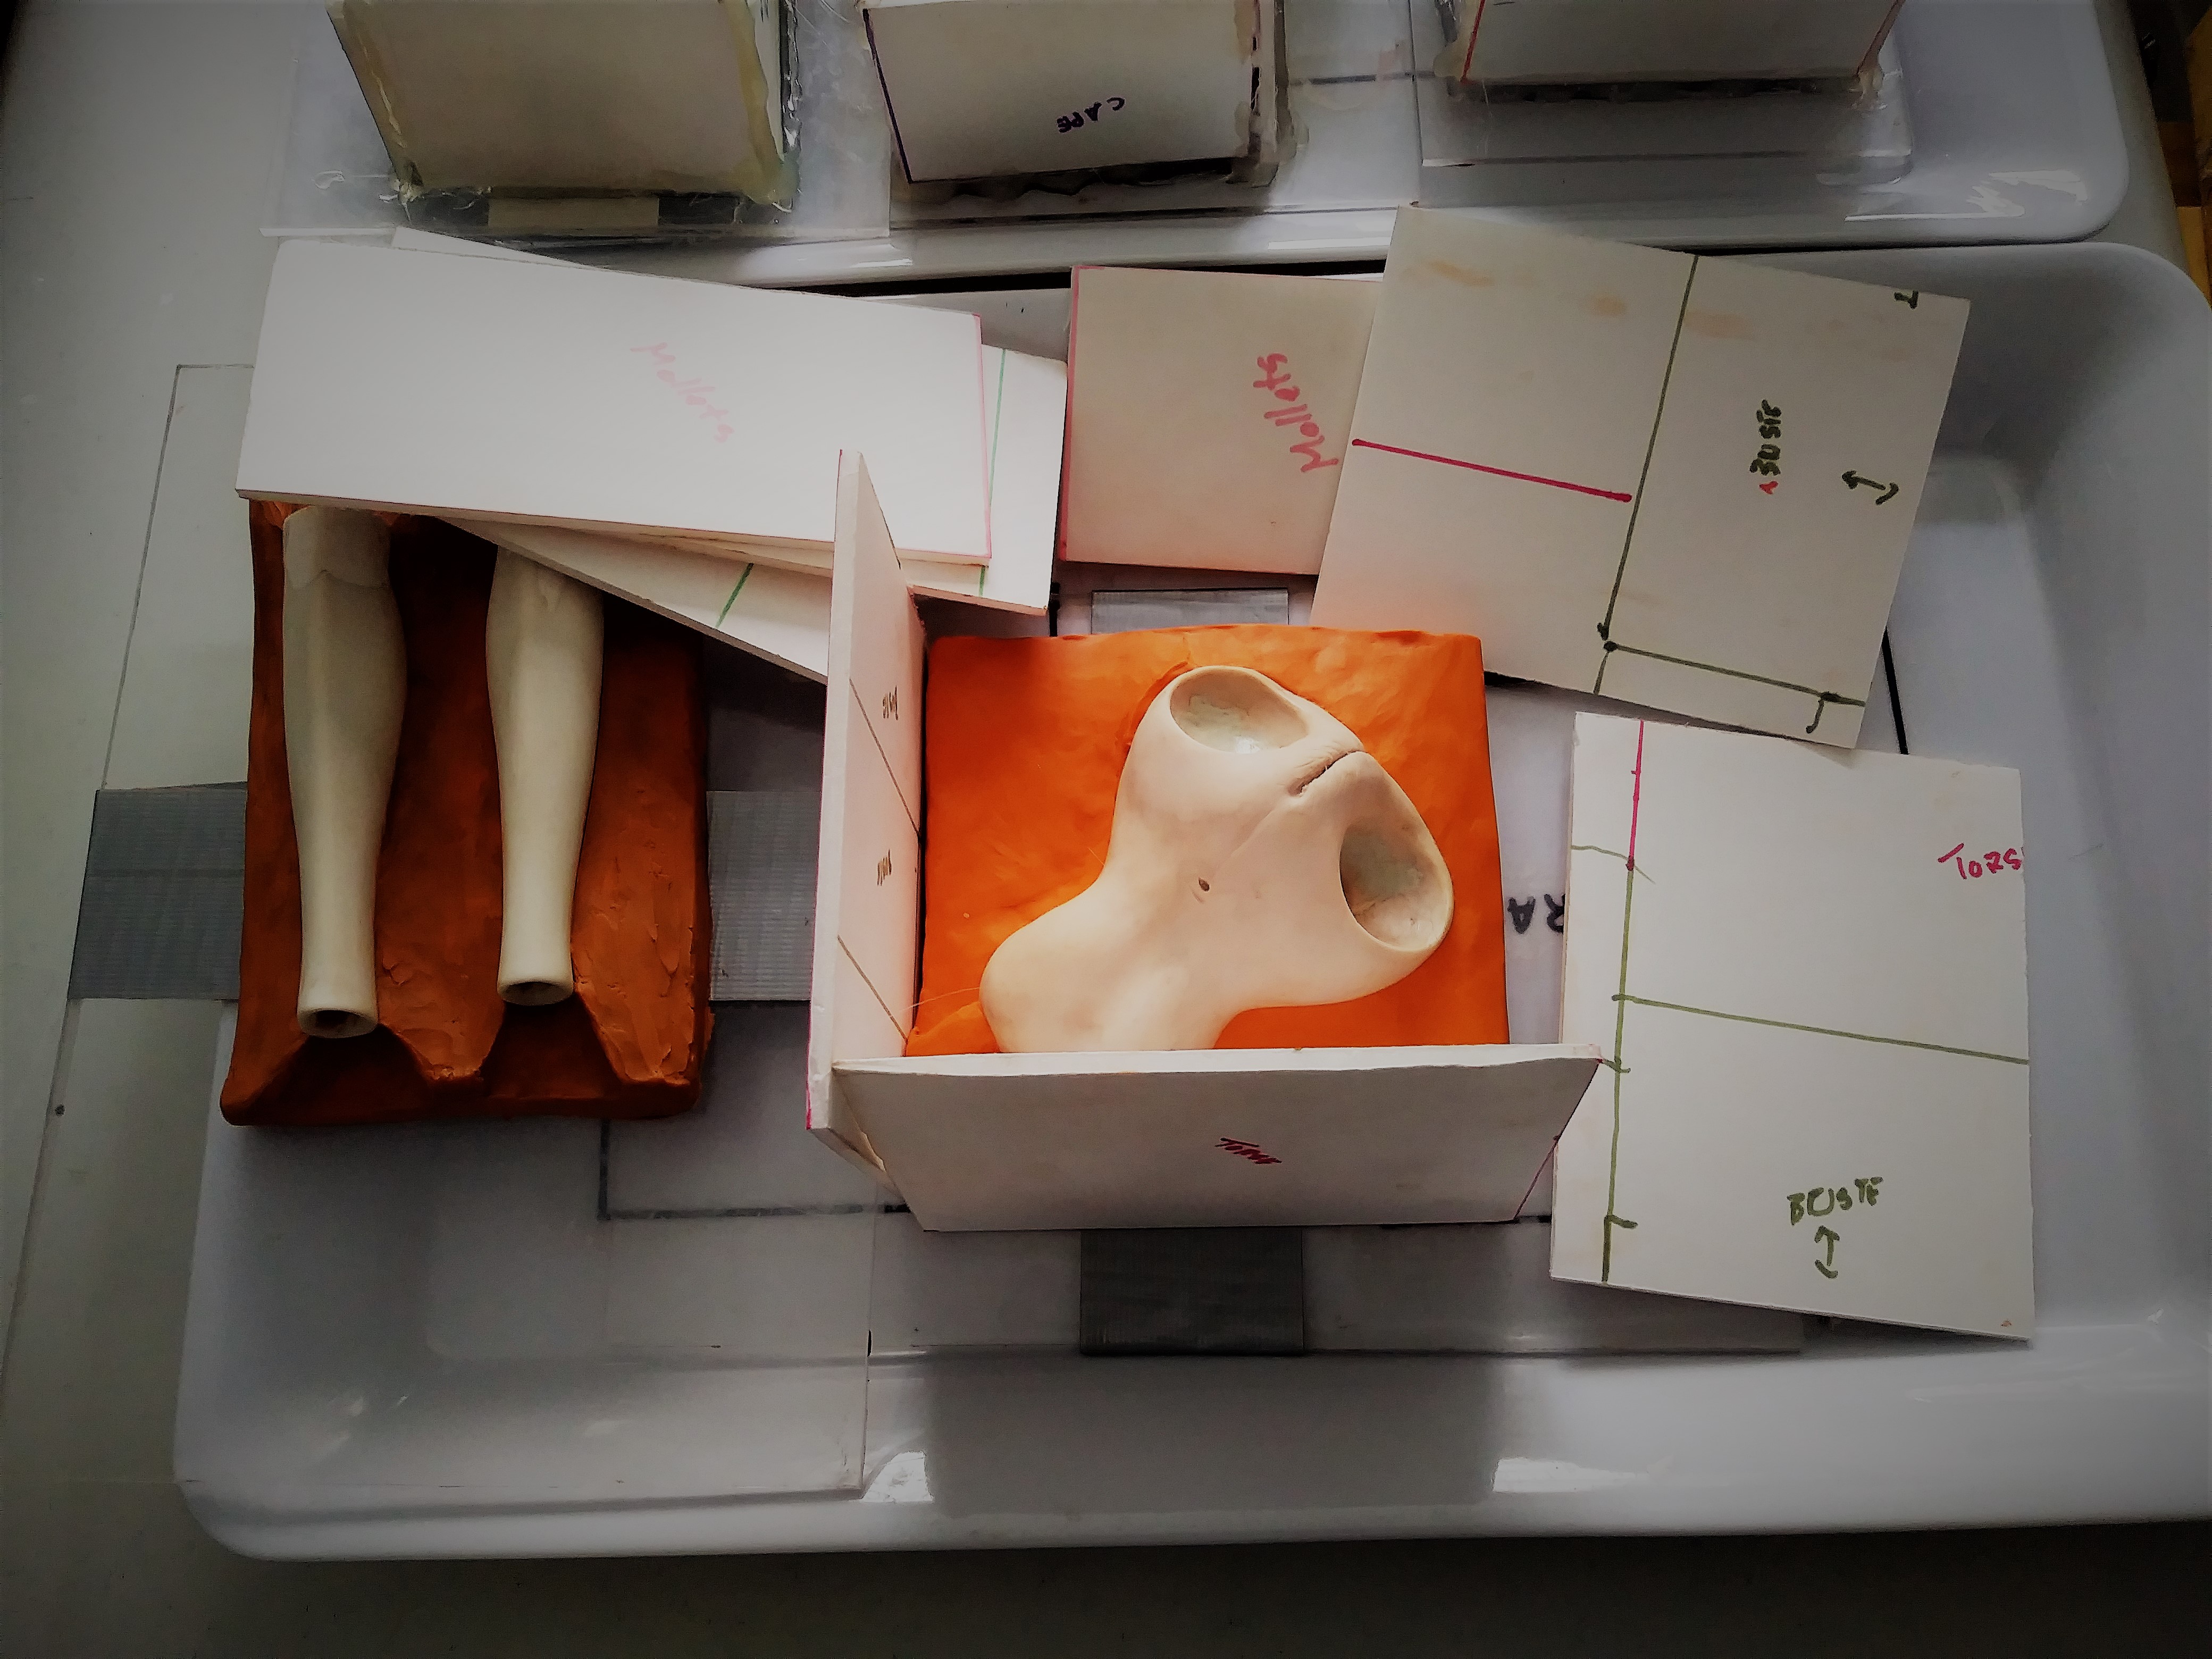
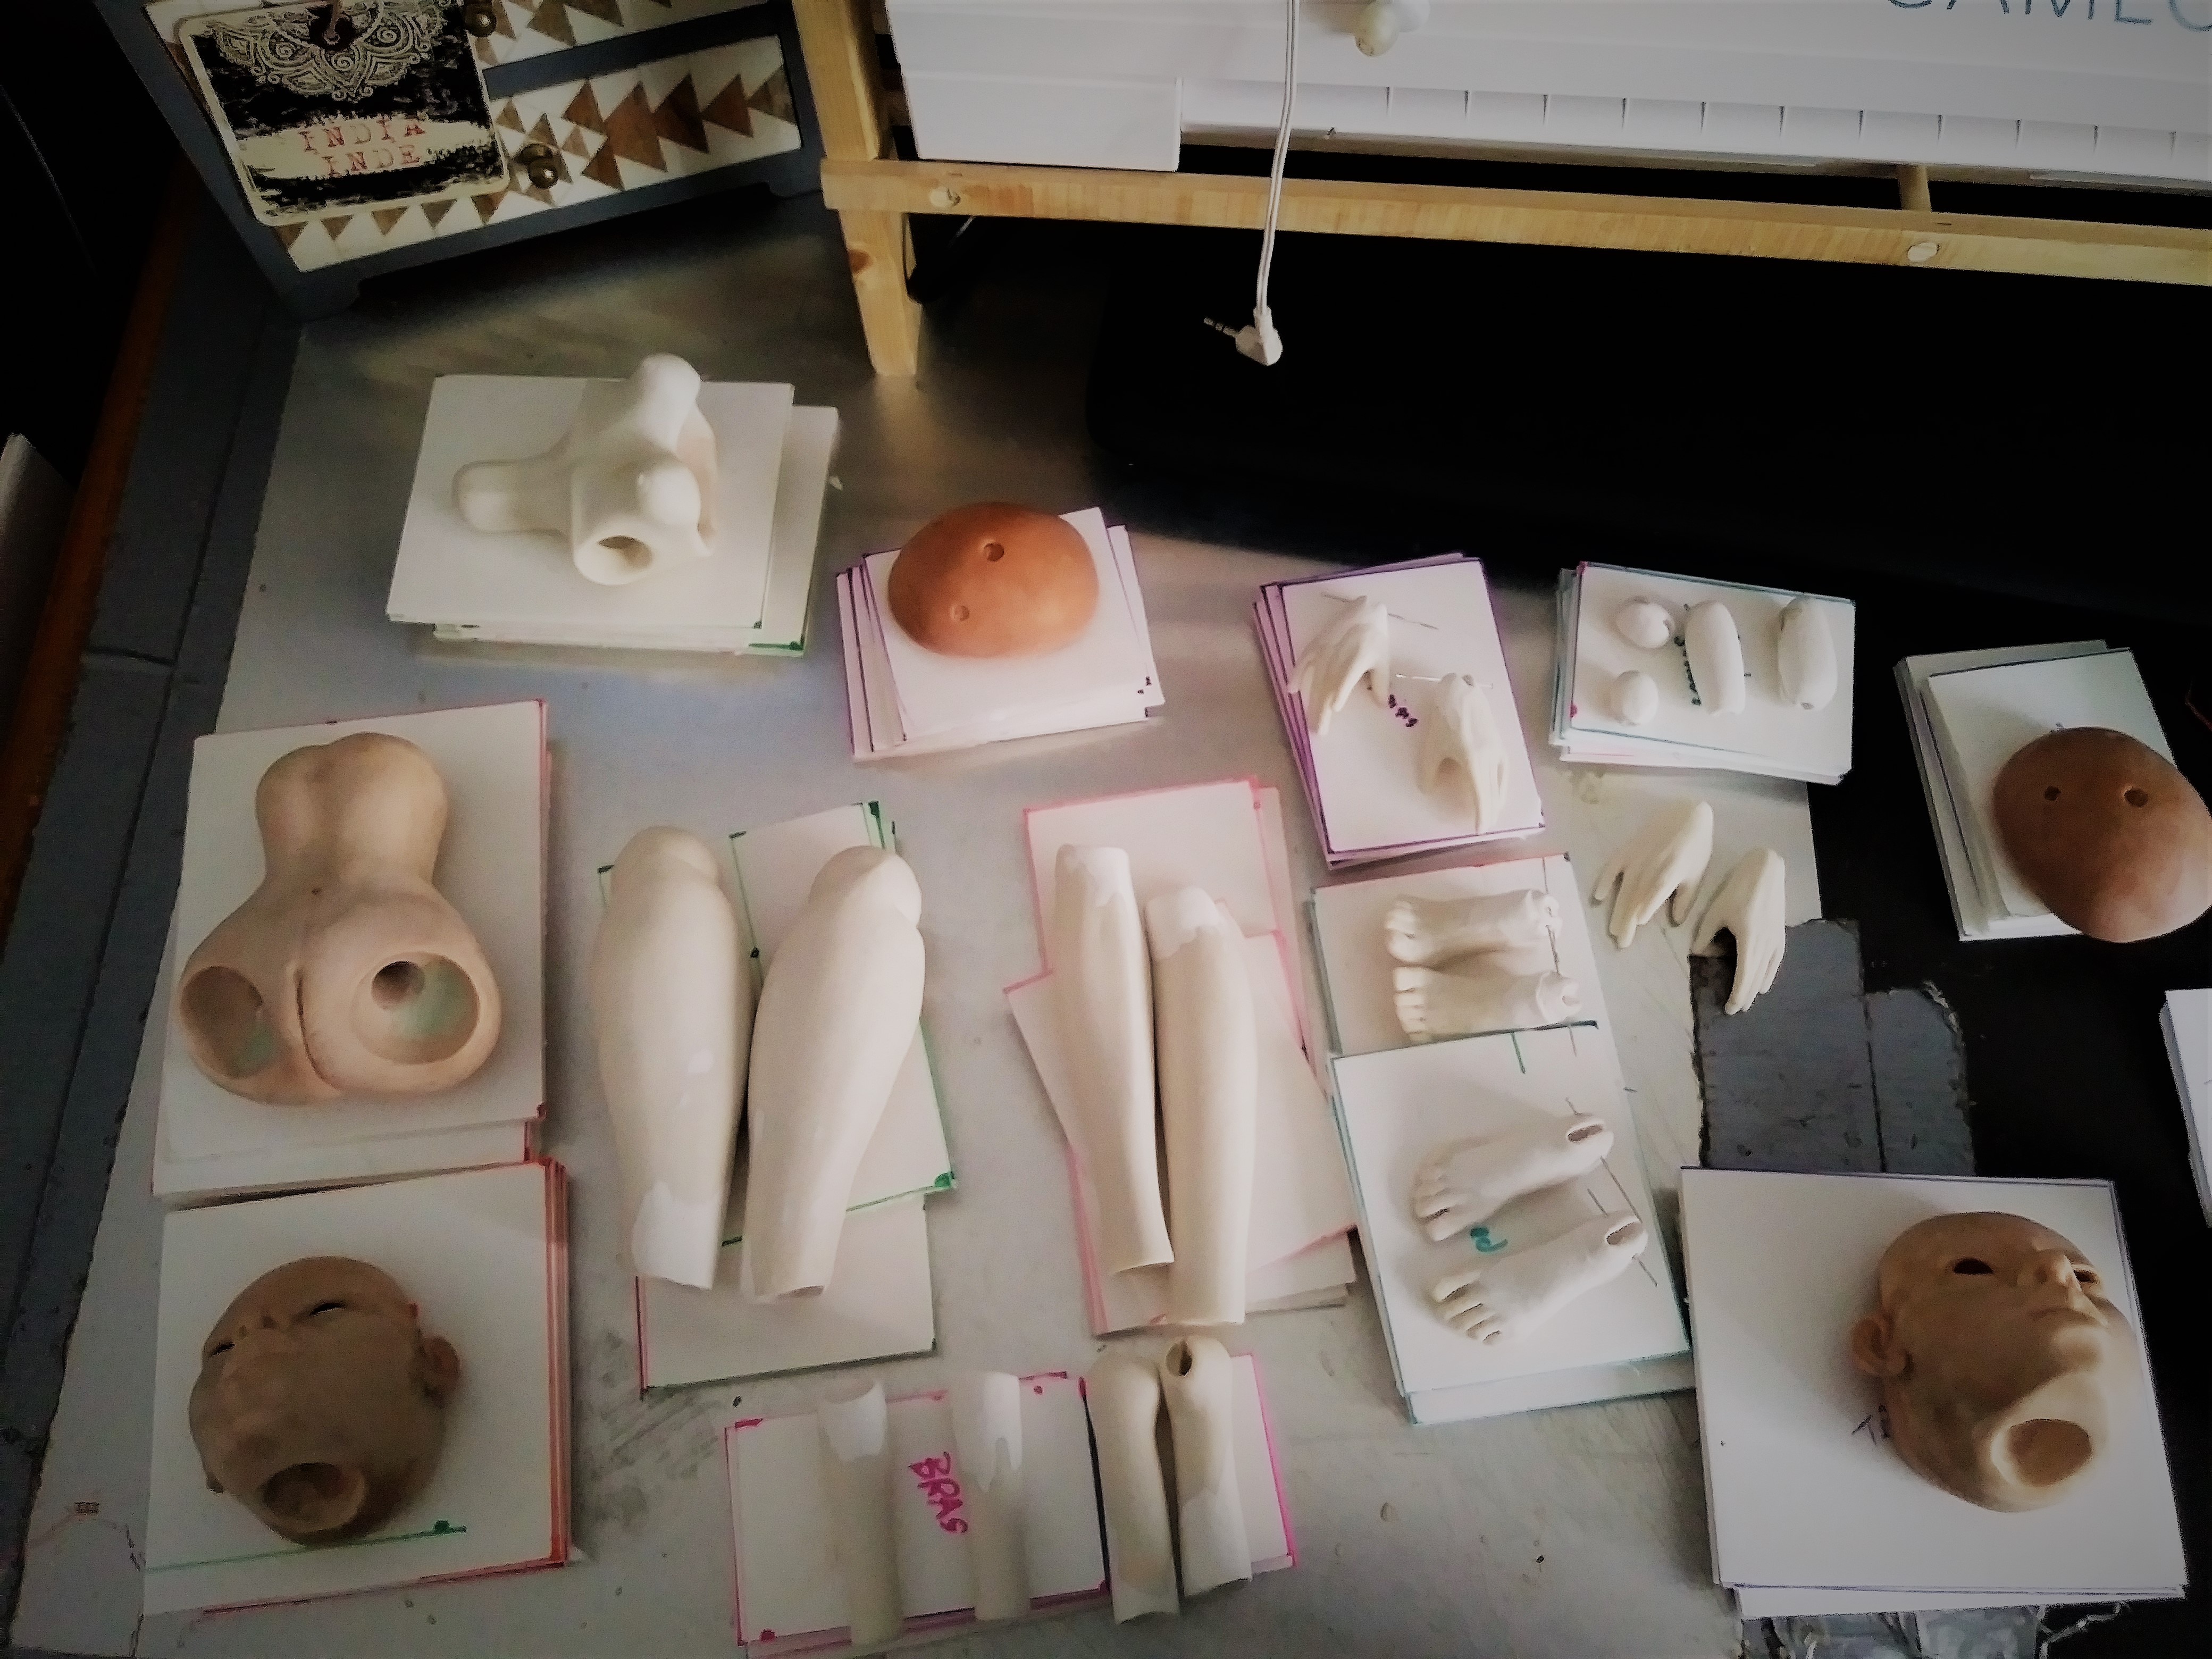
Here are the molds in question. There are twenty-six to realize for the two styles of dolls that I am making now. So, for a total of fifty-two molds. All these molds are made for two types of dolls with different silhouettes. They will be about the same height as the Barbie doll, but slightly larger. You have no idea how I cannot wait to make these two dolls.
Voici les moules en question. Il y en a vingt-six de réaliser pour les deux styles de poupées que je réalise en ce moment. Donc pour un total de cinquante-deux moules. Tous ces moules sont réalisés pour deux types de poupées avec des silhouettes différentes. Elles seront à peu près de la même hauteur que la poupée Barbie, mais légèrement plus grande. Vous n’avez pas idée comme j’ai hâte de réaliser ces deux poupées.
Molds and even more silicone molds in preparation. Many of you who follow my blog know how hard, time-consuming, and messy mold making is. You cannot imagine how many days I invested to make them happen. Many had to be thrown in the trash and restarted, especially the smaller pieces. Do not worry I took a few days off to alleviate my frustrations. In the end it is more than forty new molds that were made and I am more than satisfied because I persevered and was to the end.
Des moules et encore plus de moules de silicones en préparation. Plusieurs d’entre vous qui suivent mon blog savent à quel point que la fabrication de moules est un processus laborieux, long et salissant. Vous ne pouvez pas imaginer le nombre de jours que j’ai investi pour les réaliser. Plusieurs ont dû être jeté aux poubelles et être recommencé, particulièrement les plus petites pièces. Ne vous inquiétez j’ai pris quelques jours d’arrêt pour atténuer mes frustrations. À la fin c’est plus d’une quarantaine de nouveaux moules qui ont été réalisé et j’en suis plus que satisfaite parce que j’ai persévéré et été jusqu’au bout.
Finally! All the molds are now finished! I still have to store them in my cupboard to keep them int the dark and away from moisture. Then apply baby powder on all of the molds. Next step: pour polyurethane resin in the molds. In my astonishment, these molds are heavy and I fear for their fragility. Therefore, inspecting each mold is necessary before the resin is poured. Stay tuned for what’s next.
Enfin! Les moules sont maintenant terminés! Il me reste à les entreposer dans mon armoire hors de l’humidité et dans l’ombre. Puis, embaumés de la poudre pour bébé sur tous les moules. Prochaine étape : le coulage de la résine de polyuréthane. Dans mon grand étonnement, ces moules sont lourds et je crains pour leur fragilité. Donc, l’inspection de chaque moule est nécessaire avant le coulage de de la résine. Restez connecté pour la suite.
Second part silicone molds / Deuxième partie des moules de silicone
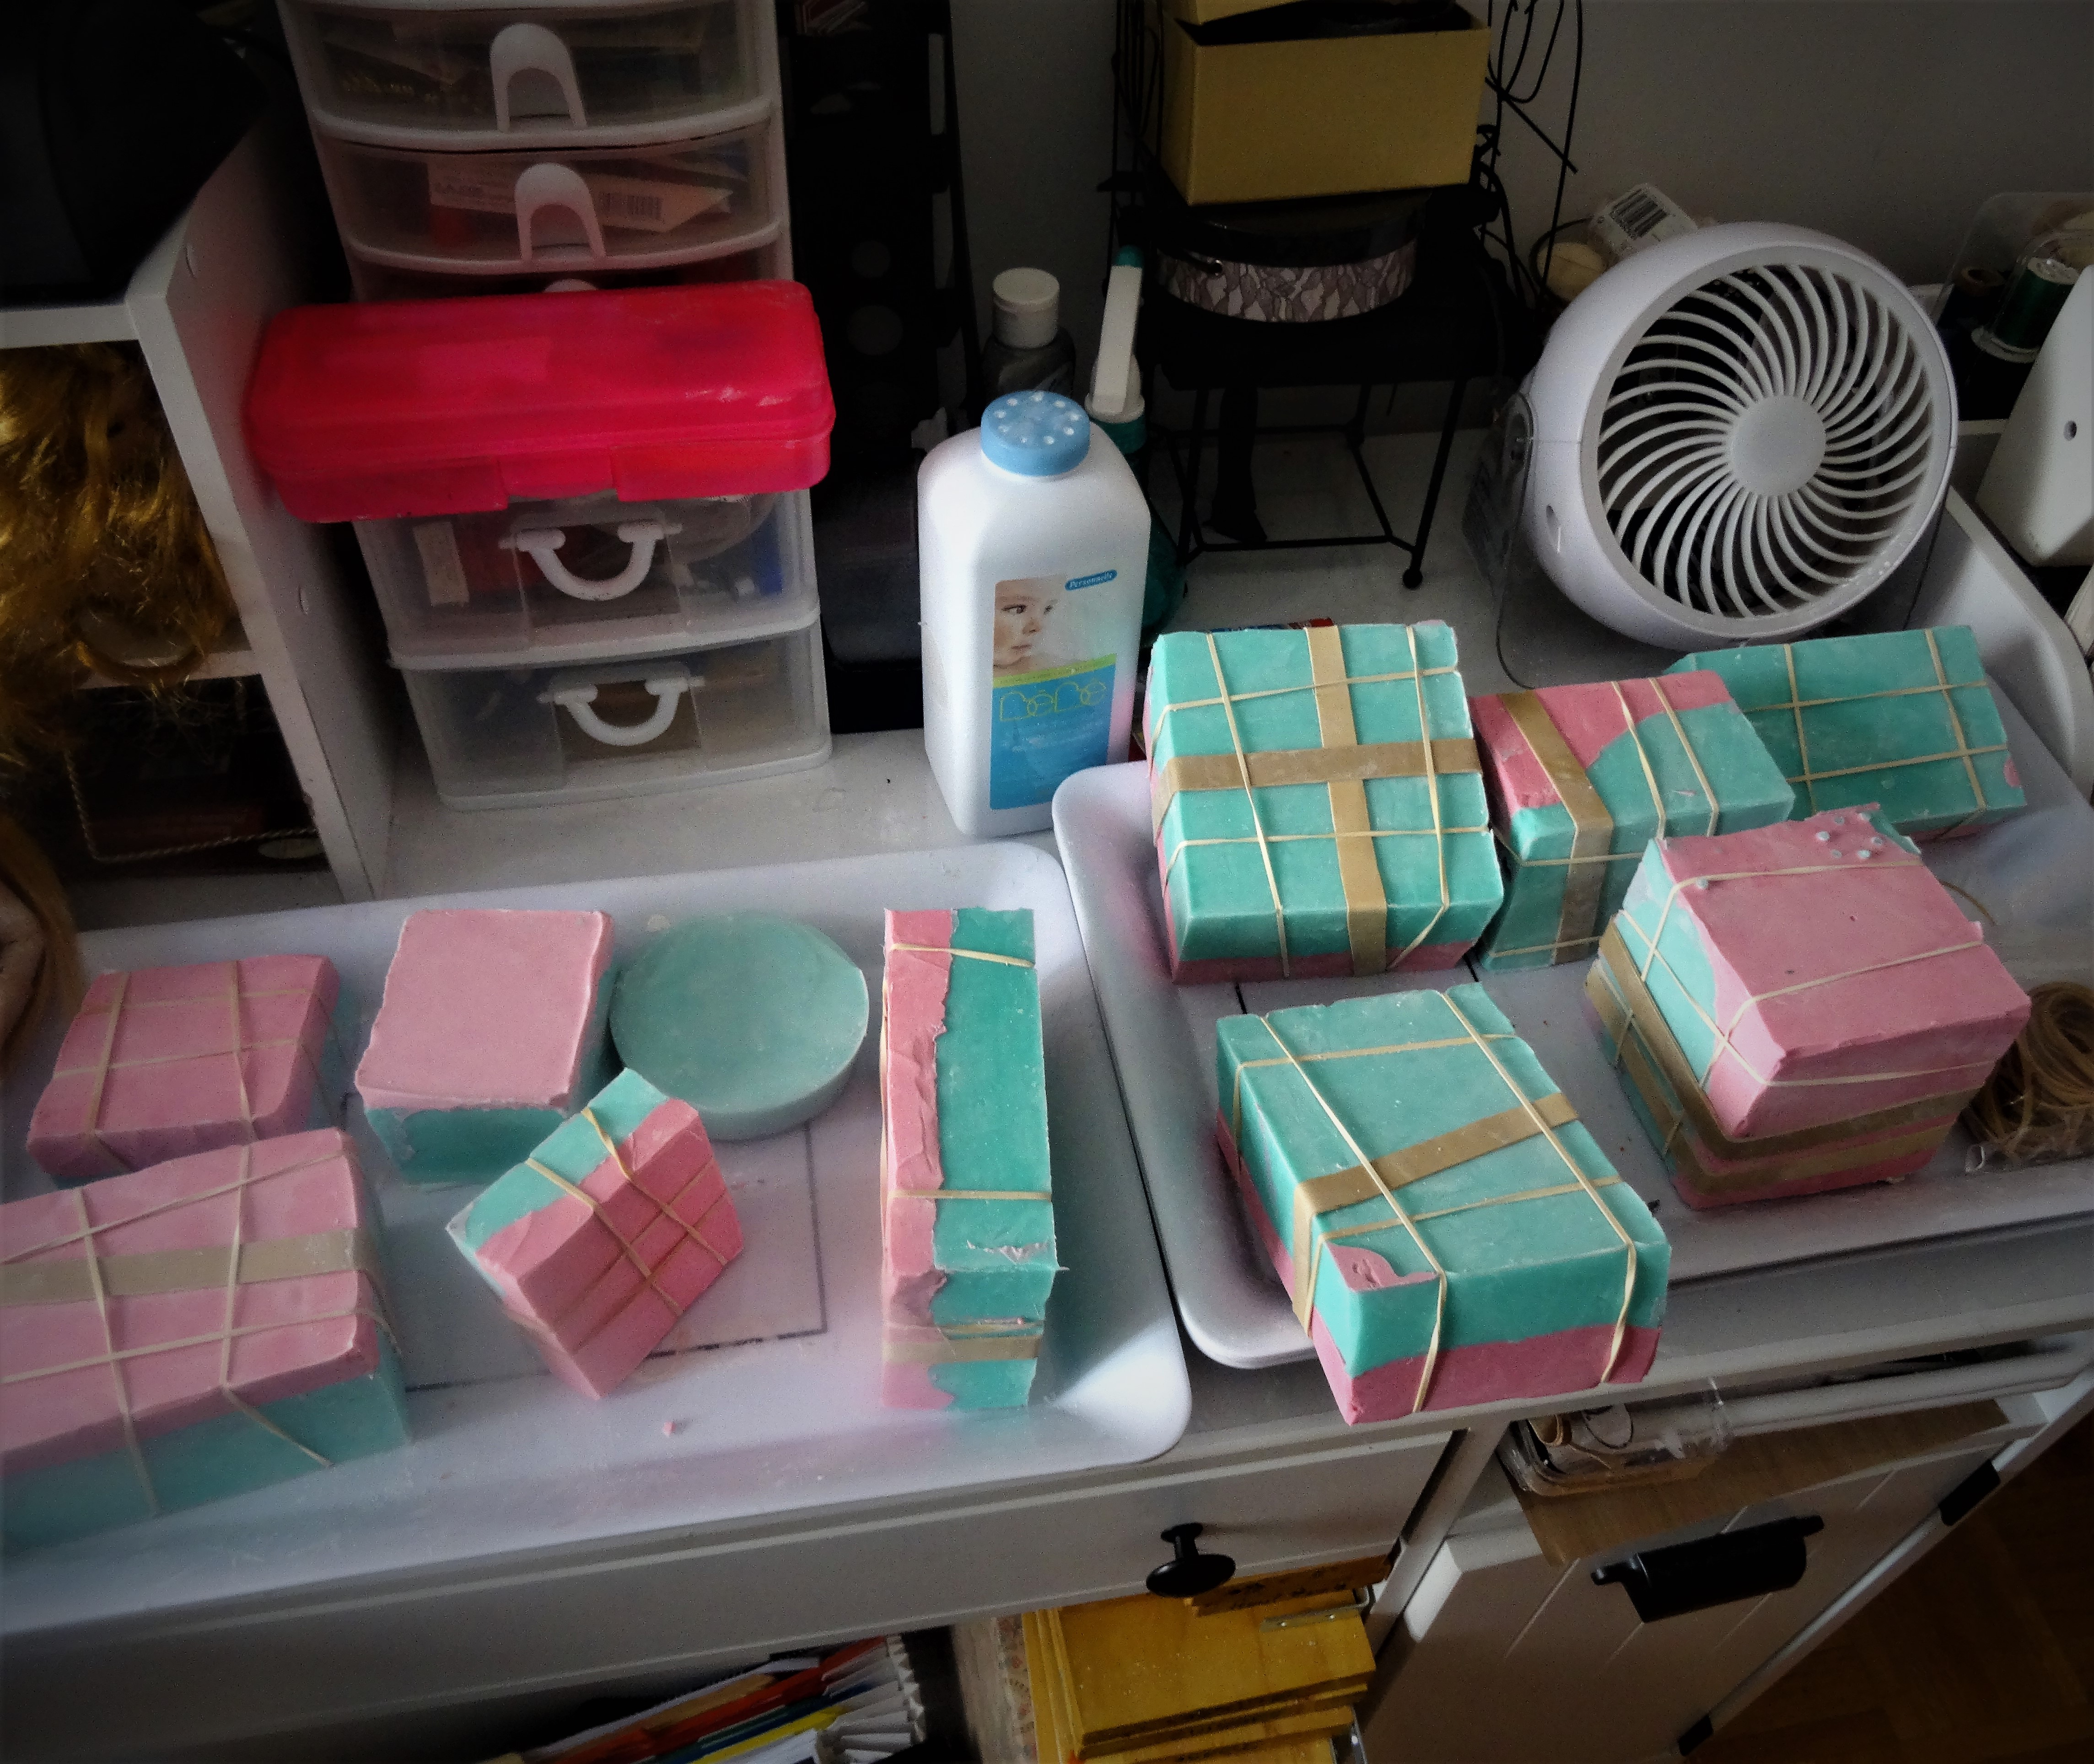
The work continues with the conclusion of silicone molds. I have to wait at least four days before I unmould all of them. Each of these molds must be identified, and then baby powder must be applied. The powder allows silicone molds to be properly stored.
Le travail continu avec la conclusion des moules de silicone. Je dois patienter au moins quatre jours avant de tout démouler. Chacun des moules doit être identifié, puis de la poudre pour bébé doit être appliqué. La poudre permet de conserver adéquatement les moules de silicone.
Hi, I am back! I can finally continue the second part of the molds and this time I decided to use another quality of silicone. This one is lighter and less rigid, but the smell… Harmful! Wearing a mask with a filter is unequivocally necessary. Opening the windows is a must.
Mixing part A & part B for making the silicone molds
Me voici de retour! Je peux enfin poursuivre la seconde partie des moules et cette fois-ci j’ai décidé d’employer une autre qualité de silicone. Celle-ci est plus légère et moins rigide, mais l’odeur…néfaste! Le porte d’un masque avec un filtre est sans équivoque nécessaire. Ouvrir les fenêtres ne fait pas de tort non plus.
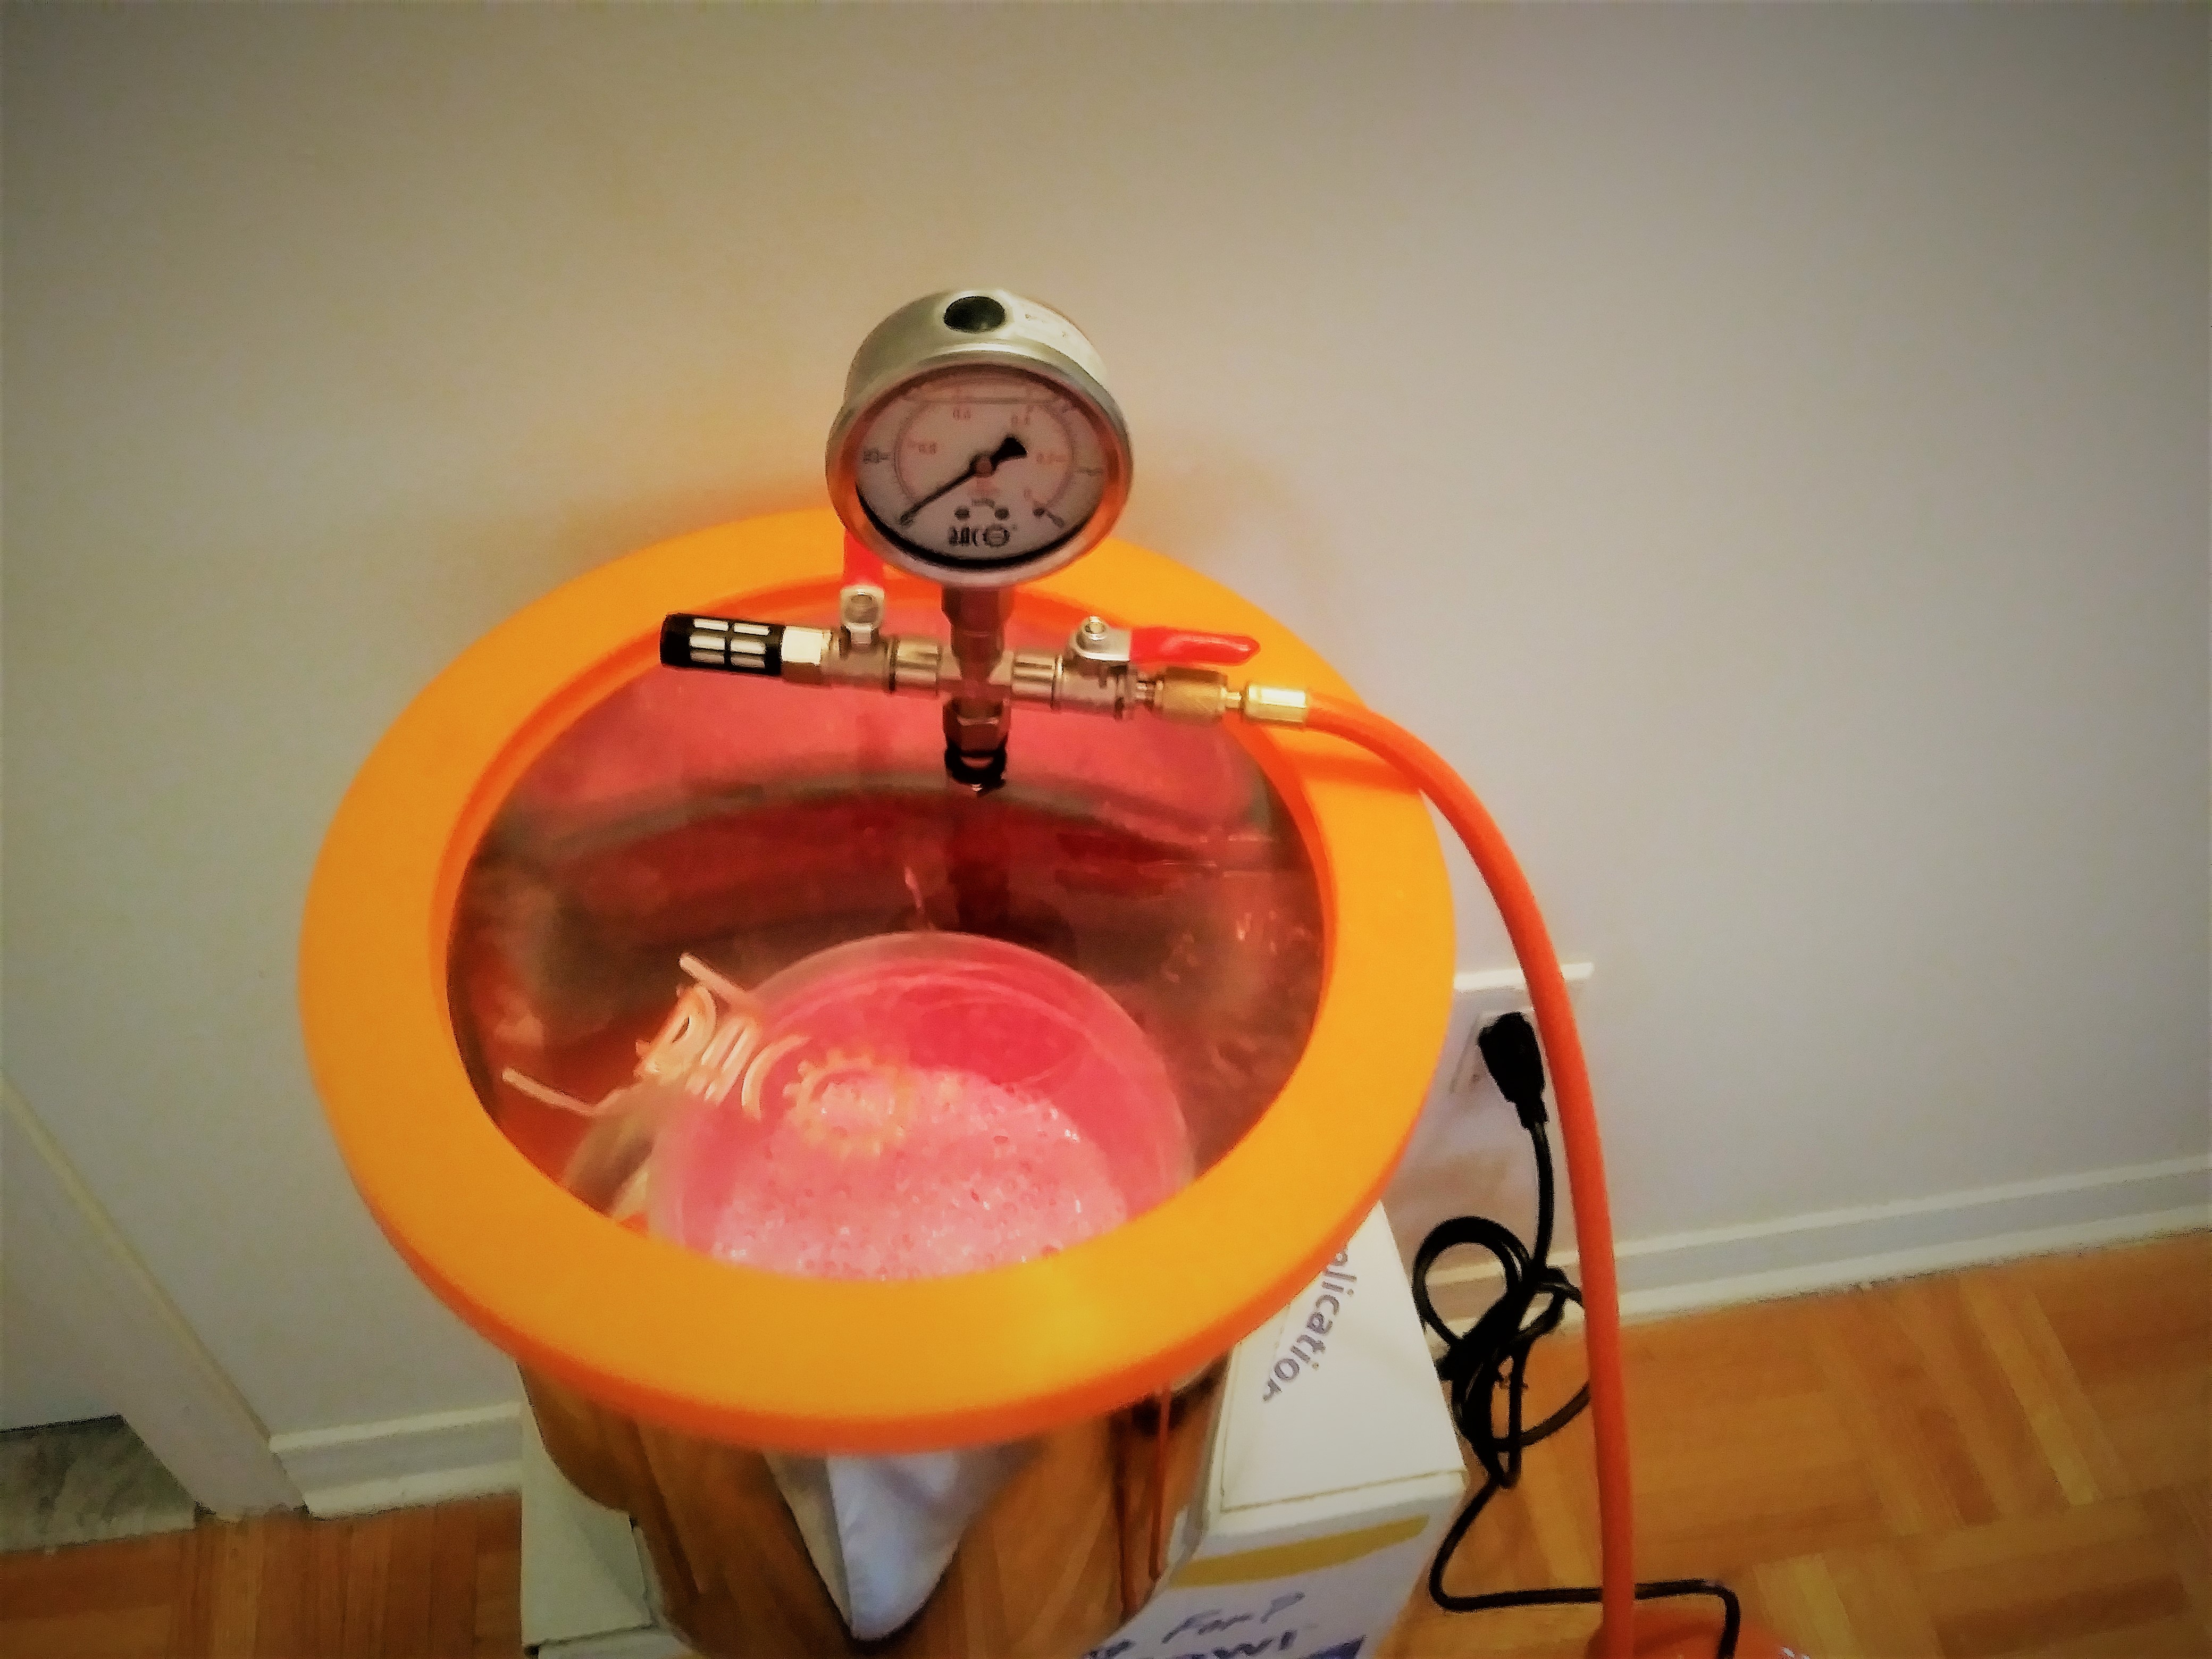
Silicone mix in the vacuum chamber/ Le mélage de silicone dans la chambre à vider
Hello! The work continues, slowly, but surely and I’m excited! My next step is to calculate the amount of litre in volume for each mold. I have to do these calculations to determine how much silicone to pour. More details will be explained in the next post. Thank you.
Allô! Le travail se poursuit, lentement, mais surement et j’en suis excitée! Ma prochaine étape est de calculer la quantité de litre en volume pour chacun des moules. Il me faut effectuer ses calculs afin de déterminer la quantité de de silicone à verser. La suite dans la prochaine publication. Merci
Good morning! The work has finally begun and I will take my time to realize it. There’s no hurry and I don’t want to skip any steps. When pouring silicone, each corner of the silicone moulds must be properly glued with hot glue to avoid unnecessary spillage. Not to mention that I have to clean and remove any traces of dust on the surface of each molds. Otherwise, I’m going to end up with parts full of reproductive defects. And I want to avoid that nasty surprise. Silicone is a very expensive high-end product!
Bon matin! Le travail à enfin débuté et je vais prendre mon temps à le réaliser. Rien ne presse et Je ne veux pas sauter d’étape. Chaque coin de moules doit être correctement collé avec de la colle chaude pour éviter tout déversement superflu de silicone lors du coulage de silicone. Sans oublier qu’il me faut nettoyer et enlever toute trace de poussière sur la surface de chaque pièce. Sinon, je vais me
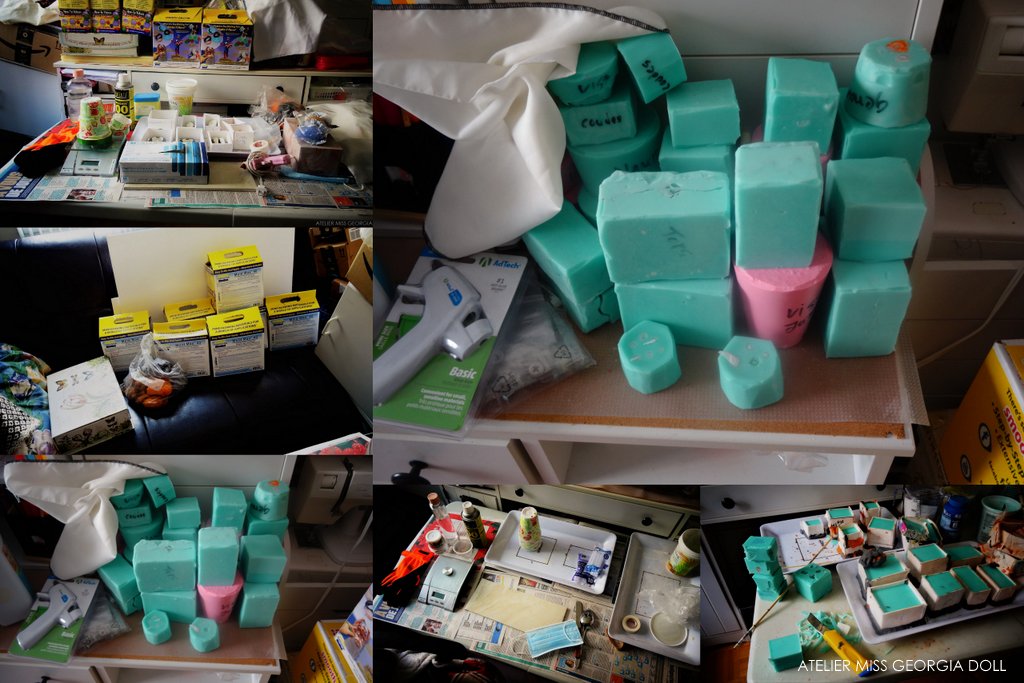
Good afternoon, my friends. The pieces of Styrofoam cardboard are finally drawn and cut. I still have to make a bed made of plasticine, eventually sticking cardboard plates with hot glue. Because silicone is less dense in volume, these moulds will be smaller than those made from plaster. This is good news and a good week of hard work awaits me.
Bon après-midi mes amis. Les pièces de carton de styromousse sont enfin dessinées et coupées. Il me reste à réaliser un lit fait de plasticine, par la suite coller plaques de carton avec de la colle chaude. Puisque le silicone est moins dense en volume, ces moules seront plus petits que ceux réalisés dans du plâtre. Ça c’est une bonne nouvelle et une bonne semaine de travail m’attend.
Ready for my first mold test/ Je suis prête pour mes premiers moules
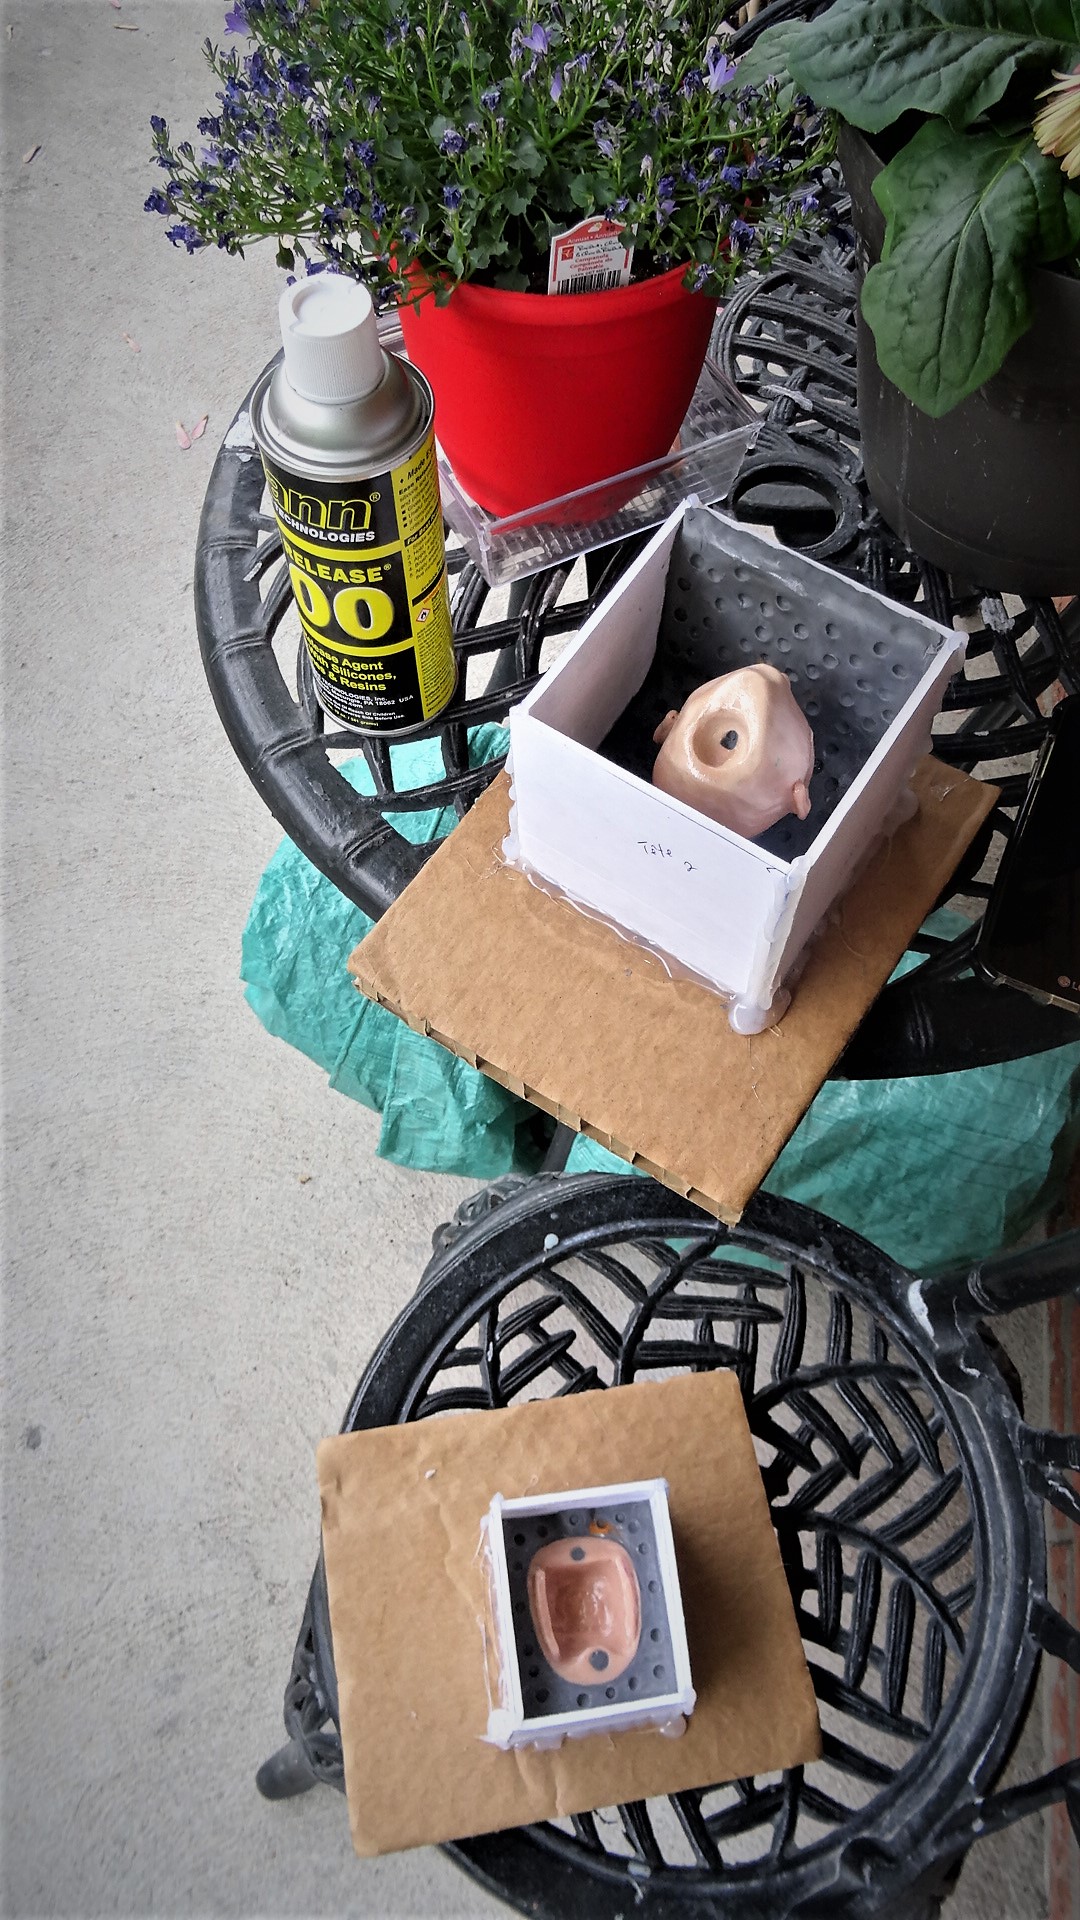
Hi all! I am ready for the development of silicone molds. However, I have to do a first test to determine how much silicone I will need. Volume is paramount for this task. I have to measure the height, width and depth of each piece. Afterwards, I have to take the measurements of each parts of the doll, and then make the molds with the help of Styrofoam boards. For this delicate operation, I will have to work outside. The aerosol spray is toxic and harmful to the lungs.
Bonjour à tous! Je suis prête pour l’élaboration des moules de silicones. Toutefois, je dois faire un premier test afin de déterminer combien de silicone que j’aurai de besoin. Le volume est primordial pour cette tâche. Il me faut mesurer la hauteur, la largeur et la profondeur de chacune des pièces. Par la suite, il me faut reprendre les mensurations de chaque partie de la poupée, puis réaliser les moules avec l’aide de planches de styromousse. Pour cette délicate opération, je devrai travaillerai à l’extérieur. Le vaporisateur en aérosol est toxique et néfaste pour les poumons.


You must be logged in to post a comment.